技术分享
技术科普|如何用 Python 实现 Coding Agent
交流图数据库技术?加入 Nebula 交流群请先填写下「你的 Nebula 名片」,Nebula 小助手会拉你进群~~
导读:在技术科普「Coding Agent」系列中,由 NebulaGraph GenAI Team @PsiACE 为大家带来多期 Coding Agent 实践经验,并分享 NebulaGraph GenAI 的最新工作。
本期,@PsiACE 分享的是如何用 Python 实现一个能自举的 Coding Agent,并给出了避坑指南,希望给大家的 Coding Agent 带来启发。
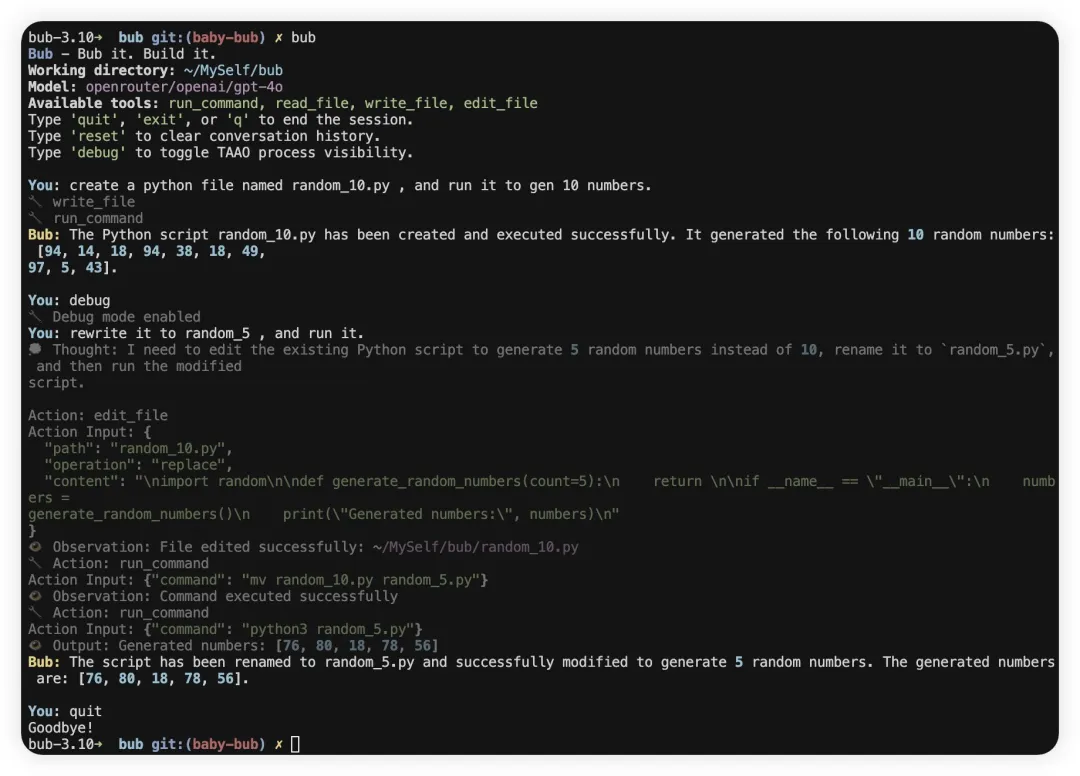
Bub 的第一个 milestone:自动修类型注解。由 Moonshot K2 驱动。
Bub: Successfully fixed the first mypy issue by adding the missing return type annotation -> Noneto the __init__method in src/bub/cli/render.py, reducing the error count from 24 to 23.
01 为什么要自己造 Agent?
Coding Agent 现在已经是个红海赛道,市面上有不少优秀的产品,还有许多团队在 PPT 中绘制宏伟蓝图。
然而,Coding Agent 的“token 大力出奇迹”现象也很明显——动辄几十万 token 的消耗,真正有价值的部分却少之又少。
这让我很好奇:如果自己动手造一个 Coding Agent,能不能找到更高效、更实用的解决方案?
于是,我开始折腾一个叫 Bub 的 CLI 助手。它的目标很简单:做一个命令行下的实用助手,同时具备有限的自举能力。自举这个概念在编译器、操作系统领域早已不算新鲜,很多 Coding Agent 也喜欢宣传“AI 工程师贡献了多少代码”。
我希望 Bub 能迈出自己的第一步,解决它自身代码中的第一个实际问题。
02 最小可用:先跑起来再说
我的经验是,能跑起来的最小闭环最重要,别一上来就追求“完美架构”或者花太多时间做数据小偷。
Bub 的分层很简单:
Agent:主循环,负责 LLM 交互、工具调用、上下文管理。
Tool:每个工具一个类,参数用 Pydantic 校验。
ToolRegistry:注册所有工具,方便扩展。
CLI:Typer + Rich,命令行入口,支持展开中间状态。
Agent 的本质其实就是一个 while 循环。每次循环,Agent 会根据当前上下文判断是否需要调用工具,如果需要就调用,然后把工具的返回结果写回上下文。
主循环核心代码
class Agent:
    def chat(self, message: str) -> str:
        self.conversation_history.append(Message(role="user", content=message))
        while True:
            # Construct context: historical messages + tool list
            ...
            response = litellm.completion(...)
            assistant_message = str(response.choices[0].message.content)
            self.conversation_history.append(Message(role="assistant", content=assistant_message))
            tool_calls = self.tool_executor.extract_tool_calls(assistant_message)
            if tool_calls:
                for tool_call in tool_calls:
                    result = self.tool_executor.execute_tool(tool_call.name, **tool_call.parameters)
                    observation = f"Observation: {result.format_result()}"
                    self.conversation_history.append(Message(role="user", content=observation))
                continue
            else:
                return assistant_message
踩过的坑
没有捕获,LLM 输出格式一变就死循环
工具参数没校验,LLM 乱传参数直接崩
Observation 反馈太长或缺乏有效信息,LLM 理解困难
03 工具定义:扩展 LLM 的能力
工具是 LLM 和外部世界的桥梁,定义得好,模型才能真正“动手”。我的做法是:
工具参数全部用 Pydantic 校验,类型不对直接拒绝。
命令行工具有黑名单(比如
rm、del),遇到危险命令直接报错。工具执行结果结构化返回,别让 LLM 猜。
操作命令行工具时,stdout 和 stderr 都很重要,不能只给 exit code.
工具之间要有明确边界,避免混淆。
class RunCommandTool(Tool):
    DANGEROUS_COMMANDS = {"rm", "del"}
    def _validate_command(self, base_cmd: str) -> Optional[str]:
        if base_cmd in self.DANGEROUS_COMMANDS:
            return f"Dangerous command blocked: {base_cmd}"
    def execute(self, context: Context) -> ToolResult:
        # Validate command, execute and return results
04 Prompt:让 LLM 按套路出牌
组织良好的提示词能显著提升 LLM 的输出质量。对于 Coding Agent 来说尤其重要,因为 LLM 的输出格式很容易失控。
我的经验
Prompt 里要列出所有工具和参数 schema。
多给几个调用示例,覆盖常见用法。
Observation 反馈要简洁,别堆无用信息。
Bub 的 ReAct Prompt 结构
You are an AI assistant with access to tools. When you need to use a tool, follow this format:
Thought: ...
Action: run_command
Action Input: {"command": "ls"}
Observation: <output>
...
Final Answer: <your answer>
ReAct 的好处是简单直接,容易落地,虽然 token 消耗大,但能快速试错、跨模型迁移。
05 Milestone:自动修类型注解
定义好 Agent Loop、工具和 Prompt 后,Bub 的第一个 milestone 就是自动修复了一个 mypy 报错。
比如:
-    def __init__(self):
-        self.console = Console()
-        self._show_debug = False
+    def __init__(self) -> None:
+        self.console: Console = Console()
+        self._show_debug: bool = False
实际的 Agent Loop
只让 agent 改类型注解、格式化、重命名,别让它碰复杂逻辑。
先用命令行工具执行
mypy,拿到报错信息。让 agent 生成修复建议,再用 file edit 工具应用到代码。
修完自动再跑一次 mypy,确保没新问题。
踩过的坑
模型对代码上下文理解有限,经常修错。
不验证,bug 越修越多。
06 进阶玩法与工程自查
随着功能扩展,踩的坑也越来越多。我的一些经验:
工具扩展时,建议单一职责,参数 schema 明确。
长对话要截断或摘要,别让 LLM 超窗。
生产环境建议沙箱/虚拟机,命令行工具默认禁危险命令。
LLM 输出格式不稳时要有 fallback 兜底。
07 总结
Bub 还在早期,但已经能帮我自动修 bug、跑命令、读写文件。我希望这只是一个开始,然后得到更多有意思的反馈。
Bub it. Build.it
项目地址
References
交流图数据库技术?加入 Nebula 交流群请先填写下「你的 Nebula 名片」,Nebula 小助手会拉你进群~~